
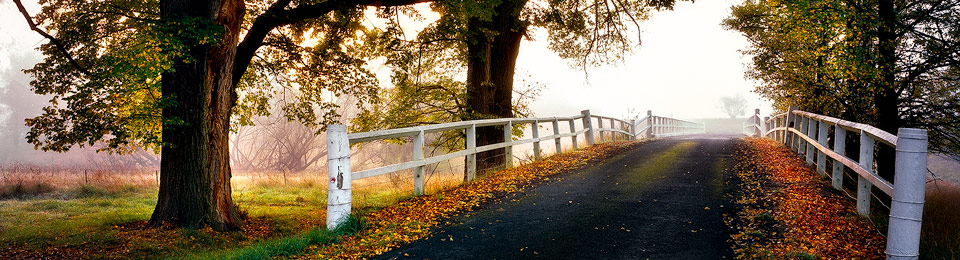


The Poor Man's Pano Head - A Beginner's Guide to Shooting Panoramic Images
Once the domain of big 6x17 medium format panoramic film cameras such as the Fuji GX617 & Fotoman 617, wide panoramas are now within easy reach of anyone with a digital camera.
At AustralianLight, we use a number of techniques to create our panoramic images, including the 6x17 film cameras mentioned, as well as specialist tilt-shift lenses and digital stitching.
Digital stitching is what we'll be discussing throughout this blog post, as this is a technique that just about anyone can utilise, and one that every landscape photographer should have in their "toolset". Digital stitching involves the combining/blending of multiple digital images - each with their own unique view - into one seamless, wide angle image. Modern software programs makes it easier than ever before, but there are still a few things to be wary off if you want the best possible result.
Most importantly is the use of a panoramic head on your tripod. Panoramic heads are designed to correct for parallax error (i.e. the slightly different view seen as the camera is rotated around the scene) by allowing the camera to rotate around the lens' optical centre. Now, quite often you will see this referred to as "nodal rotation" (rotating the camera around the lens' nodal point), but I believe this to be a technically incorrect term, as it is rare for the lens' nodal to coincide with the lens' optical centre.
Panoramic tripod heads vary in price, but as with all things, you get what you pay for. The cheaper units tend to be a little wobbly and can struggle with the larger DSLR cameras, while the more expensive heads are very stable and cope with big DSLR cameras with ease. Sadly, they do tend to hurt the wallet somewhat and this can be quite a hurdle for those wishing to take their first steps into panoramic photography.
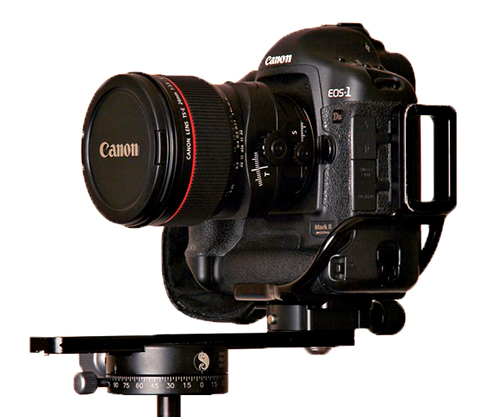
Not being one to shell out the big-bucks, especially if I think I can construct something myself, my first venture into this world of panoramic heads was a hybrid, home-made DIY creation - a combination of various photo gear and hardware store bits and pieces. My "Poor Man's Pano Head" was the result and it was a great way to start learning the ropes of shooting panoramic landscapes.
Firstly I needed a way to offset the camera on my tripod so that it could be "centroptically rotated" (remember "nodal rotation" was wrong, so I came up with my own term - it means to be 'rotated around the centre of the optic'). One of the cheapest and easiest ways to do achieve this was with the use of a macro slider. A quick look at eBay and $49 later, an Olympus OM Macro Slider was all mine. I then needed a way to mount my camera in portrait (vertical) orientation, so I stopped by at the local hardware and purchased a $3 L-shaped bracket. Two small holes where drilled - one to mount the camera, and the other to bracket and Bingo!… a stable & adjustable panoramic head for less than $55.
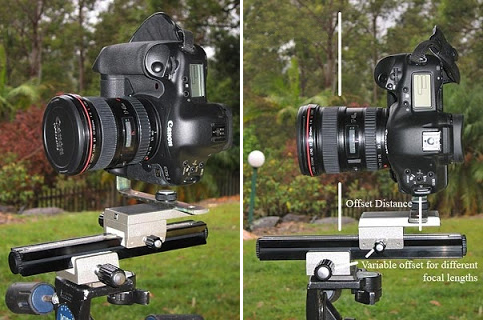
In the second image I have marked the camera offset so that you can see how it rotates around the optical centre of the lens. This means that during its rotation, the relationship between lens and subject does not change and that the resulting images will blend and match perfectly.
As you can see, the macro rail is perfect for this application, as it allows adjustment of the offset for a set of different lenses.
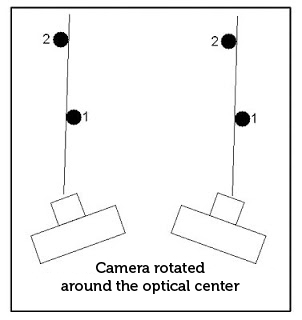
Beating The Parallax Error
The following digram shows how centroptic rotation does not effect the relationship between objects within our images and why this makes for easy stitching.
This following diagram, however, shows the contrary and how objects appear to move in relation to each other when the camera is not rotated centroptically. As you can imagine this presents challenges for stitching, as no two stitch areas will be the same. Of course the problem is exacerbated by having near and far objects within your image, and this can make for impossible stitching situations where image elements will simply not line up.
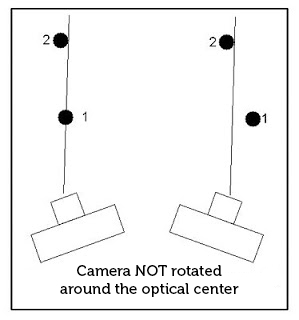
Images with far distant objects only (i.e. mountain scenes, wide sweeping vistas, etc.) don't generally present a problem with stitching, regardless of the inaccuracy of the rotation.
So how do we determine our lens' optical centre?
There are a number of databases available on-line that will let you know the offset required, but there is quite a simple trial & error method that will find the offset quickly and easily.
This method requires that the camera be mounted on your levelled panorama head with some offset applied. Find two objects within your image, one close and one further way, and position them to the left side of the viewfinder. Note the relationship between these two objects (i.e. how far they are apart) and then rotate the camera so they are now positioned on the right side of the viewfinder.
Did the relationship between these two objects change? If yes, you did not rotate around the optical centre, so adjust the camera offset and repeat the comparison. Once you start repeating these comparisons, you will easily see the effect of changing the offset and with a little tweaking you will soon find the offset required where the relationship does not change from left to right - this is the offset required for centroptic rotation.
Now that we have determined the correct camera offset, we are ready to create panoramas!
Keep the camera level
It is important that the tripod be set perfectly level and that its adjustments are set to zero, as the camera must be rotated through a level plane. This will ensure that a straight image is produced, rather than a "wavey" stitch requiring manipulation or heavy cropping of valuable pixels to become rectangular again.
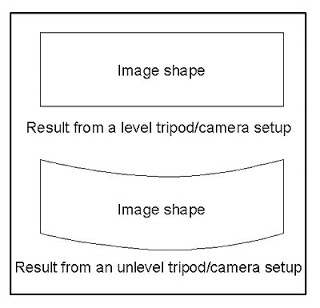
If the tripod is not fitted with a bubble level, then a small inexpensive level can be purchased from the local hardware store, or a quick search on eBay will yield ones that sit in your flash hotshoe. Once the camera is rotating through a level plane, panoramas can be created.
The Shooting Technique
- Visualise the image format you desire and have a good idea where you intend to start and stop your image. Cardboard cutouts, or format lines drawn on clear plastic can greatly assist with this visualisation process.
- Select the focal length lens that gives the required vertical Field Of View (FoV)
- Set the camera offset for the given focal length as per instructions above.
- Select the required focus distance and turn Auto Focus off, as focus needs to remain the same throughout all images.
- Select the required exposure using the Manual Exposure feature, as once again, consistency between images is vital.
- Take a photograph of your hand covering the lens. (trust me)
- Begin your first image on the left, well past the intended start of the panorama.
- Rotate the tripod head base, overlapping the second image on the first by 1/2 or a 1/3rd of the frame.
- Continue overlapping images until well past the intended end of the panorama.
- Take another photograph of your hand covering the lens.
By placing your hand over the lens at the beginning and end of each set of images, start & stop points are created and each set then becomes readily apparent when selecting images in post production. This will save a ton of time and ensure no mixups.
Post Production - Putting the images together
There are a number of applications available to stitch panoramas and its up to you to find what works best for you. My recommendation however would be PtGUI or Photoshop. These come at a cost, but the results speak for themselves. If you're on a budget, check the software disk that came with your camera, as quite often the camera manufacturer has supplied stitching software.
Now, I mentioned above about shooting more images than required. This is to help reduce the amount of image lost at the ends of the panorama due to image warping. The panorama software needs to warp each image so that it aligns with the next - this means that the ends of the panorama will taper down and result in a crop being required for square corners.
By shooting additional images at either end, you will ensure that the tapering occurs outside of your required image area and that little image data be lost to cropping.
Other Options
The above setup still stands as an excellent way to get started in the the world of stitched panoramas, but there are lighter, more compact, and more expensive options available. My current configuration consists of an RRS Panning Clamp fitted directly to my tripod ball head, a sliding rail to adjust offset and an L-bracket on all my cameras for quick and easy mounting in either vertical or portrait orientation.
Like the Poor Man's Pano Head, this does not cater for traditional multi-row or spherical panoramas, but when combined with the +/- movements of the shift lens seen here, huge Fields of View & image sizes can be created.
Sweep Panoramas & the Mobile Phone
Surprisingly, mobile phones these days do a pretty good job at creating panoramas - it's a simple matter of "sweeping" the phone through the field of view and having a panorama automatically generated for you. I think these are a great tool for the panoramic photographer, not because they produce files capable of producing huge prints that rival the quality of traditional methods, because they don't, but because they are a wonderful tool to aid the visualisation process.
A quick "PhonePano" can be created in seconds and the photographer can then determine if a high quality panorama is worth taking!
The Last Word
Have fun and experiment - try different focal length lenses, different degrees of rotation and most certainly different locations. Panoramas need not always be of wide open places - they are equally adept at portraying wide views in very compact spaces. Spaces where even the widest of lenses fails to encompass the view required!
Cheers, Russell.
See more Landscape Photography Tips
Comments & Feedback