10 Tips for the Landscape Photography Beginner
It's quite common for us to be engaged by other photographers when we are out shooting our landscapes and more often than not, the conversation develops into a mini-workshop.
It seems that people are mostly looking for the simple little tips & techniques that improve landscape images. So with their questions in mind, here are some "simple" tips to help you get the most from your landscape images.
1: Be mindful of the light.
I realise that many landscape photos are simply taken when the opportunity arises, rather than being pre-planned… but if it's at all possible, timing your photography to coincide with "interesting" light, can lift your results tremendously.
The Golden Hour: 'The Golden Hour' is a commonly used term that derives its name from the golden light seen just after sunrise and just before sunset. While this warm light (yellow/gold being considered warm, while blue is considered cool) provides an attractive hue to a landscape image, its low level also provides interesting elongated shadows that can be used as part of your composition, or to help define shape and form. This is a very popular time for landscape photographers.
Sunset / Sunrise: Of course we all love shooting directly at sunsets and sunrises, but often the vast differences in brightness between our foreground and the sunset itself can be a little hard to handle. If we expose for a golden sun, the foreground becomes dark. If we expose for the foreground, the sun & sky become a washed out white. There are several ways around this, including the use of graduated neutral density filters & exposure bracketing, but they are not something that I would put into the "simple tip" category.
My simple tip to cope with this situation is to wait for sun to be at the horizon. It is at this point that you have the maximum amount of atmosphere between you and the sun, this will help reduce the sun's intensity and you will have a lesser difference between foreground exposure and sky. You will most likely have much more colour too! Wait a little longer and the sun will start dipping below the horizon line… with every second the sun's intensity will decrease further and the balance of light will become more even.
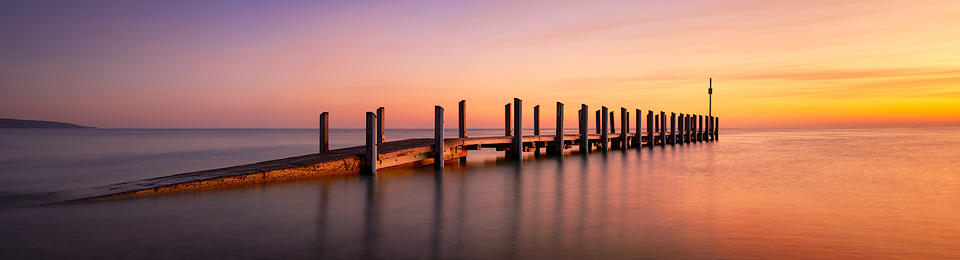
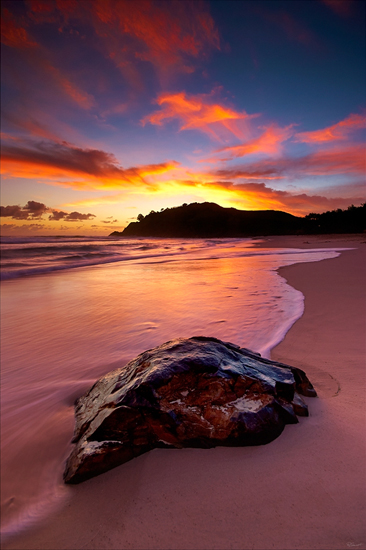
This image is a combination of using a neutral density filter and waiting for that right moment when the sun is just cresting the horizon...
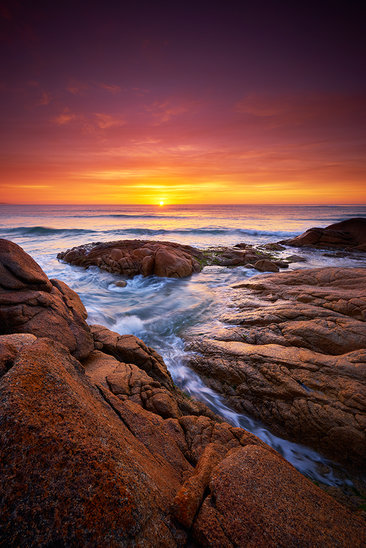
So you need to be prepared, have your image composed and shoot through the entire sunset period. Often the perfect moment is the last, with the sun just cresting the horizon and a natural flare extending into the sky. As a bonus, the lack of direct light hitting the lens at this late moment will minimise the risk of those nasty lens flares that so often spoil an otherwise great image.
Twilight: Stick around after sunset. In fact, don't go anywhere until you need your torch to see. Twilight brings a whole new life to landscapes and often the pastel tones of this period can be breathtaking. Be prepared with your tripod however, as exposure times will most definitely be too long to hand-hold your camera. On another note, these longer exposures are a bonus if you are dealing with water subjects, as the water movement can also make for interesting misty / blur effects.
Look Behind You: While waiting for the perfect moment, keep an eye on the light behind you. We all tend to get so hung up on what we are waiting for in front of us, that we miss the awesomeness that is going on behind us. So sometimes it's best to have two compositions in mind and with a little pre-planning you can often achieve both with a simple swing of the tripod head, rather than a relocate. Remember, the light changes quickly during the "golden hour" / twilight periods, so you need to be able to recompose fast!
So does this mean that taking landscape photos in the middle of the day is the wrong thing to do? Of course not! There are no hard and fast rules to photography, but hard daylight from above can be difficult to make interesting at times and dark shadows can become problematic, as they will often lose detail. So try pick a landscape subject that works well with the full daylight hours… Beaches with blue water and desert scenes with red dirt work particularly well, for example.
2: Minimise camera shake & movement.
As I mentioned above, exposure times can become too long to hand hold and a tripod is needed. But using a tripod all the time, even for your shorter exposures is not really silly idea. I find that it greatly aids my composition, as it allows for little tweaks and repeatable results. Yes you can hand hold, but getting exactly what you want, over and over again (as exposures are adjusted or as LCD reviews are confirmed) is nearly impossible. Some people like to shoot a little wider view and crop later to overcome this problem, but I want every single solitary pixel I can squeeze into my image, so it's the tripod method for me personally.
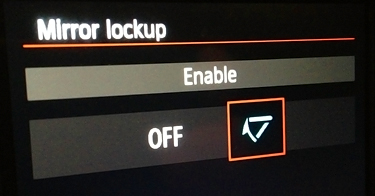
The use of a cable / remote release or 2 second timer will also help minimise movement, as will the use of 'mirror lockup' if your camera has it. The DSLR's mirror is there to redirect the lens' image to the eyepiece for composition, but during the exposure it needs to swing out of the way and allow the light to travel directly to the sensor. The swing and stop motion can induce small vibrations that affect longer exposures, allowing the mirror to move out of the way a couple of seconds before the exposure will allow these vibrations to dissipate.
3: Shoot at your lens' sweet spot
In general, all lenses have a particular aperture at which they work best. In landscape work, we all tend to chase massive depth of field (i.e. everything in focus from close foreground to distant background) and many photographers head straight for the smallest apertures (i.e. the bigger numbers like f/22). This may in fact be making things worse -- in a "soft and fuzzy" kind-of way.
A light travels through small apertures (holes) it gets diffracted or "bent" around the edges, this means that the nicely defined wave of light that was on its way to making a nice crisp image on your sensor, becomes and slightly bigger, fuzzy one and this results in a slightly out of focus image. It seems that many of the most popular landscape lenses operate best in the f/8 - f/16 range, but to find out where your lens sweet spot is, simply mount the camera on a tripod, fix the focus, shoot an image at every f-stop and compare the results. You may be quite surprised where your lenses perform at their best.
4: Focus at the Hyperfocal Distance.
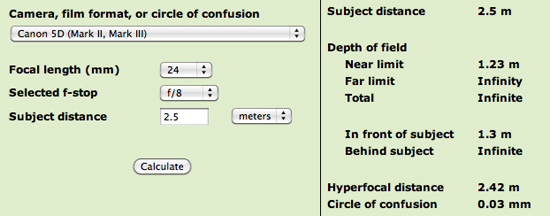
Now that you have tested your lens and know its ideal aperture, focusing at the the Hyperfocal Distance for that aperture will maximise the Depth of Field (DoF) that you can obtain.
Using the DoF Calculator from DOFMaster.com, a 24mm lens on full frame cameras such as the 5D models, when focused at just 2.5m, only needs f/8 to provide acceptable sharpness from 1.23m to infinity.
If we shoot at f/11 and focus at 1.8m, we can bring that closest point of acceptable sharpness back to less than 1m, while still maintaining a far distance of infinity.
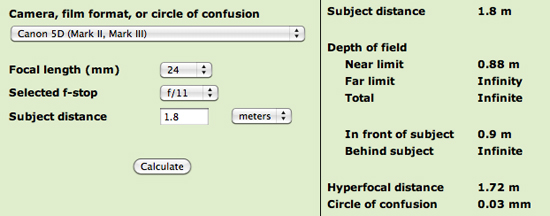
So as you can see, we don't need to be stopping the lens way down to small apertures to generate great Depth Of Field. We simply need to understand at what aperture our lenses are the sharpest and calculate the Hyperfocal Distance for that aperture.
Once you have done this, you can pretty much shoot with with a pre-determined focus / f-stop configuration and feel confident that you will get the results that you are after.
5: Composition
Try and include some foreground interest - some rocks, where water is flowing, a puddle reflecting the sunset sky, or perhaps even an old tree stump and its weathered texture. Experiment with what is at hand and let it provide some balance to the background elements. Also try and use the elements within your shot to create leading lines. Leading lines are elements within your your image that lead the observer's eye around the image, for example, a curve in a beach, the line of a breaking wave, or a path or stream.
6: Keep the horizon level.
Horizons that run downhill are very effective in making the image look un-natural to the viewer. Even if they don't actually recognise the downhill slope, they will still feel that something is not quite right. Many cameras now have inbuilt electronic levels, but if your camera doesn't then a simple (and cheap) bubbled level cube can be fitted to your flash hotshoe.
7: The Rule Of Thirds
Placing objects of interest in the dead centre of an image can look very staged, but a simple offset can fix this problem. Placing objects and/or horizons at or near the 1/3 positions makes for a much more balanced and natural feel. Remember, it's not really a "rule" but more a guideline, so don't take it too seriously -- if a composition works in other ways, use that to your advantage too!

8: Use a Polarising Filter
While polarising filters are most commonly used to darken blue skies or to cut through reflections on water, they also add a general richness of colours. The trick to using polarisers is the understanding that they are variable. Sometimes an image may need just a little polarisation, other times a lot. So think about its application -- do you really need to cut through all of the reflection? Does a super-blue sky sky look natural in your image, or will it look best if just a little darker?
Polarisers are also effective neutral density filters, as they will often double your exposure time when used at their maximum polarisation. It's fairly common to see approximately a 2-stop increase in exposure durations, however this is very dependent on the brand and type of filter. Keep these filters in mind when you are trying to capture that extra bit of movement within your images.
One last thing about polarisers - be careful when using them with wide angle lenses. The amount of polarisation varies with the angle of light. Wide angle lenses, as the name suggests, capture light throughout a wide area of the scene and any polarisation variation due to this is easily captured. So it's not uncommon to have an unnatural looking dark patch of sky showing up in the middle of your image. To avoid this, try using only a slight amount of polarisation (if you must use any at all).
9: Shoot RAW Image Format
If you want the best image that your camera is capable of producing, then using the RAW format is a must!
RAW is your "digital negative" -- it is every bit of data that your camera captured at the time. JPEG images, on the other hand, have been converted from RAW data by your camera. Image adjustments such as sharpening, saturation & contrast have been applied by your camera and, when saved, the JPEG compression (which in itself is an inheritantly destructive image format) means that some of the original image data is lost due to compression and conversion.
Yes, the RAW image format means that processing of images is required, and I understand that many people are not ready to head down that road just yet. But if this is you, I would highly recommend shooting RAW + JPEG, as this gives you the best of both worlds… JPEGs for now & RAW for when you head down that path in the future. Who knows, a couple of years from now, you may be shooting nothing but RAW and loving the image quality benefits of the format… wouldn't it be terrible to look back on all your great images from today and wish that you had RAWs to process from?
Another good reason for RAW, and one that I experienced quite recently, is that RAW conversion software continues to evolve. As it gets better with each new release, so does the image quality produced. It's fantastic to go back to an older image and reprocess it to a whole new level of quality.
10: Be prepared for failure
Nine out of ten times the light won't play... but it's that tenth time that makes it all worthwhile. So be prepared to return several times, with persistence you will get the shot you are looking for.
See more Landscape Photography Tips
Comments & Feedback