
Flash Diffusers... No need to spend big dollars!
I see many forum threads extolling the virtues of the latest and greatest camera flash diffuser, wiz-bang light modifier or best ever bounce attachment.... the "must have gadget that makes your on camera flash produce studio lighting".... etc etc
Well the fact is.... physics has not changed! Light still travels in straight lines, is diffused and bounced just like it always has been, sees it's intensity drop to 1/4 as the distance doubles and can only be made "soft" in ONE way..... by making it BIGGER in relation to the size of the subject being lit.
This is the principal behind both bouncing and diffusing our flash units. Bounce the flash off a ceiling or umbrella and the light source becomes much bigger. Diffuse our light source through an attachment like a light box and it becomes much bigger.
Of course size is relative to distance... ie: a 100cm soft box will give lovely soft light when 50cm from your subject, but put it a 5m and it starts to become "relatively" small to the subject and the resulting light will be much harder and result in more defined shadows.
What about on-camera diffusers that are not much bigger, how well do they work?
Basically these diffusers would be better off called "bounce" attachments, as the relatively small increase in physical size does little to provide a softer light. Instead, they spread the light in all directions, so that it can bounce back off walls and ceilings etc.
Naturally a percentage of this diffused light makes direct contact with the subject and it is the combination of this direct light (which is strongest because it took the shortest route) and the weaker bounced (or "fill") light that makes for a more pleasing light with no harsh shadows.
How do these diffusers work outside, or in large open rooms with nothing to bounce off of?
The short answer is.... not very well. As I stated earlier, the relatively small increase in physical size does little to provide a softer light and if there is nothing to bounce off there will be no secondary "fill" light. So in effect these diffusers make things worse in these situations, as they waste light that could otherwise be used to light the subject directly.
I have seen demonstrations where one flash attachment is used to fill a whole ball room of people. How does this work?
Yes I have seen those too, but don't be fooled, as there is information that has been conveniently left out. In the demonstrations that I have seen, the photographer avoids mention that a much wider aperture or higher ISO value has been used. When this is done, the pre-existing ambient lighting becomes a very large player in the exposure.
So the result is NOT as much about how good the attachment is, but equally (if not more) about the different photographic technique used. In the case of a wider aperture, the result comes at the loss of DOF (depth of field) and this is not desirable when trying to keep large number of people in focus.
So what is the best flash diffuser that covers all applications?
None! All the diffusers work given the right situation (normally enclosed spaces), but no "one" is the best at everything. It is my advise to have experience with a number of attatchments and techniques and apply the best one for any given situation.
Here are a few guides to remember when you search for your new flash diffuser....
1: Diffusers are LARGE (ie soft boxes and umbrellas) and need to be set close to your subject to maintain relative size.
2: Most "On camera" diffusers are really "bounce" attachments and have little to no direct diffusion effect, but rely on the diffused spread of light to bounce back off nearby objects. (There are some units that look like little soft boxes and are used as direct flashes.... these are still too small for great diffusion effect in most situations like portraits, but are very good for tiny subjects like macro, where "relative to the subject" they are actually large.)
3: There are many diffusers available on the market today and regardless of the price and makers claims, you can achieve the very same results using everyday items as simple as a business card, tracing paper or even your hand if a warmer tone is desired.
4: All diffusers require an understanding of both flash & ambient exposure and how these can be combined for effective results.
5: When testing diffusers always use the cameras fastest shutter speed for flash sync and at least f8 or f11 at 100ISO. This will ensure that ambient light plays little part in the result and you will get a true indication of the diffusers ability.
6: Don't be baffled by the smoke & mirrors presented by many of the expensive falsh attatchment manufacturers. They have an agenda to sell you something... and that's normally a 5 cent bit of plastic at $50-100+!!
The following image is to give you some idea of the results from various techniques...
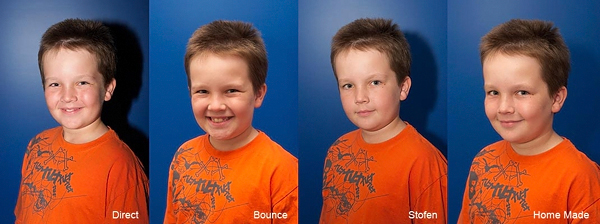
As you can see from these images, the most natural looking result, with no harsh shadows, comes from my Home Made diffuser....

A 40 cent sheet of tracing paper!!
That's right, a 40 cent sheet of tracing paper and the results are every bit as good as a popular $100+ plastic flash diffuser.... and would you believe that the one 40c sheet can make about 6 of these? (depending on the size of your flash head)
These diffusers are just tubes rolled around the flash head and can be held in place with something as simple as a rubber band. (Here I have used velcro buttons)
The principle behind this design is simple. The open top allows direct light to travel to the ceiling and bounce back providing broader fill light. Because this bounced fill light travel farthest to the subject, it is best that it not be diffused at the source.
The diffused light coming through the tracing paper does two things. Lights the subject directly and also bounces off walls & nearby objects to create additional fill.
So the overall effect is that of having multiple diffused light sources coming from multiple directions.
Cheers, Russell.
Comments & Feedback